Steve's Triumph Spitfire 1600
The ongoing saaaaaaga

Propellor Shaft:
First, Which Differential?:
Some would certainly consider a change of differential for this swap especially if a turbo was in the cards, so of course it would be best to tackle that first. I was keeping the same 3.27:1 GT6 differential I've been running for years, so pretty simple. I guess the good thing is that if a person did the differential change later, to say an R-160 or such, at least it again requires a shorter driveshaft so you’d just have to do the cut and balance thing again.
Drive Shaft Options:
I did a lot of reading on this subject as I was hoping we could have done it ourselves; if we had an extra Miata Shaft on hand we may have attempted it. That written, although it does seem a simple task to cut and re-weld a driveshaft, there is much to read and learn about, especially how important the positioning of the yolk is wrt harmonics. Also a failure of this weld could get pretty ugly. Pretty easy decision at only 200 bucks labour; we had the pros do it (again, very proud that that was the only thing we had to pay to have done).
The choice here is to…
1. use the Spitfire Shaft with the Miata Yolk grafted onto the front,
2. use the Miata shaft with the Spitfire Yolk grafted onto the back, or
3. make a hybrid U-Joint… the idea of using different dimension u-joint caps within the same joint was intriguing. If the centre shafts are the same size I could get one u-joint for the Spit and one from the Miata and then just change two of the caps around so they fit in each of the yolks. Of course the shaft would still need to be cut.
The Miata driveshaft was plenty long, which of course is much easier than having to make it longer!
Staked U-Joints:
Staked u-joints on the Miata shaft make it more difficult to replace them, Mazda says to replace the entire shaft, but enough guys have written about fitting new u-joints that I wouldn't hesitate doing it myself; for now the ones I had were in decent shape I thought it best to leave it unmolested and graft the Spitfire Flange to the back.
Here are a few links to sites/forums describing how to swap staked u-joints….
http://rockforddriveline.com/Staked_Instructions.htm
http://forum.miata.net/vb/showthread.php?t=519198
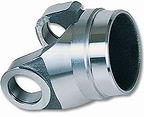
The image to the right shows how Staked U-Joints are kept in place. Rather than using clips on either the outside or inside of the yolk, the manufacturers just place the U-Joint in position and then deform the metal of the yolk into "stakes" that keep everything aligned and secure. Of course although this is very quick and simple for manufacturing, it slightly complicates matters for the Shade Tree Mechanic.

Driveshaft Rear Yolk:
Typical Weld Yolk
For the back we never pursued the hybrid u-joint option, just used the Spitfire Weld Yolk grafted onto the Miata shaft.
If one wanted to try it, there is some good info here wrt u-joint sizing.
http://mgaguru.com/mgtech/propshaft/ps103.htm
I was concerned that the machine shop might need another weld yolk and that might take extra time, but when I went in they didn’t even bat an eye. They do this stuff everyday and I’m sure have simple inexpensive fixes to make it work.
Now that I’ve explained how we decided on which part of each shaft we were going to use, I’ll step back a bit…)
Drive Train Geometry:

While we were establishing correct drive train geometry, to get some reasonably accurate angular measurements we cut the shaft, at the back of course, just short enough so that with the front installed into the Tranny we could slide it up in front of the Differential Flange to take our numbers.
A simple, inexpensive magnetic protractor works great here, however for those rich guys with them new fangled "smart phones" there are a few apps available that are as effective, maybe even better.
Taking these measurements from underneath wasn’t really a problem, but after the Parking Brake assembly was removed it was so nice to work from above.

Final Cut:
Once the geometry was set we took the appropriate measurements to have it cut and balanced. Making it too long would obviously be costly to re-do and although there is a little forgiveness on the short side, I really didn't want to reduce too much the contact area of the splines within the Tranny. My ¼” safety buffer worked pretty well.


Transmission Output Shaft Seal:
Also for 20 bucks or so a new output seal was cheap insurance and very easy to install.
The Guys:
Again, Cardanic did the work for $200.
Cardanic Drive-Line & Machine Shop - 175 Toryork Dr, North York, ON M9L 2Y7. No web-site, but in the Yellow Pages.
My guys at 77 AutoParts put me onto them.
Results / Follow Up:
No vibration at any speed.